Are you on a quest for knowledge about Netgear Dynamic DNS Account ? Your search has led you to the perfect blog post. In this informative piece, we not only define the term but also provide a step-by-step guide on how to effortlessly set up your account. Without any more delay, let’s delve into the specifics.
Netgear Dynamic DNS Account: An Introduction
Dynamic Domain Name System, is a service designed to automatically update the IP address information associated with a host name. The DNS server undergoes updates as soon as the IP address of the domain name undergoes a change.
It’s crucial to note that after setting up your free MyNETGEAR DDNS host name, a monthly confirmation is required. Failure to do so may result in the deletion of your host name. Now, let’s continue exploring how to set up a Netgear Dynamic DNS account.
Setting Up Your DDNS Account: A Step-by-Step Process
Launch an Internet Browser:
Begin by opening a new browser tab. While this may seem obvious, we acknowledge that beginners could be following this guide. Enter the correct IP, ensuring accuracy (e.g., use 192.168.1.1, not 192.168.1.250).
Precaution: Ensure your web browser is updated to the latest version, and clear browsing history and cache to prevent technical issues.
Log into the Netgear Router:
Access the login window and input ‘admin’ for the username and ‘password’ for the password. Exercise caution with case sensitivity and typing accuracy.
Precaution: Avoid the common mistake of swapping username and password fields.
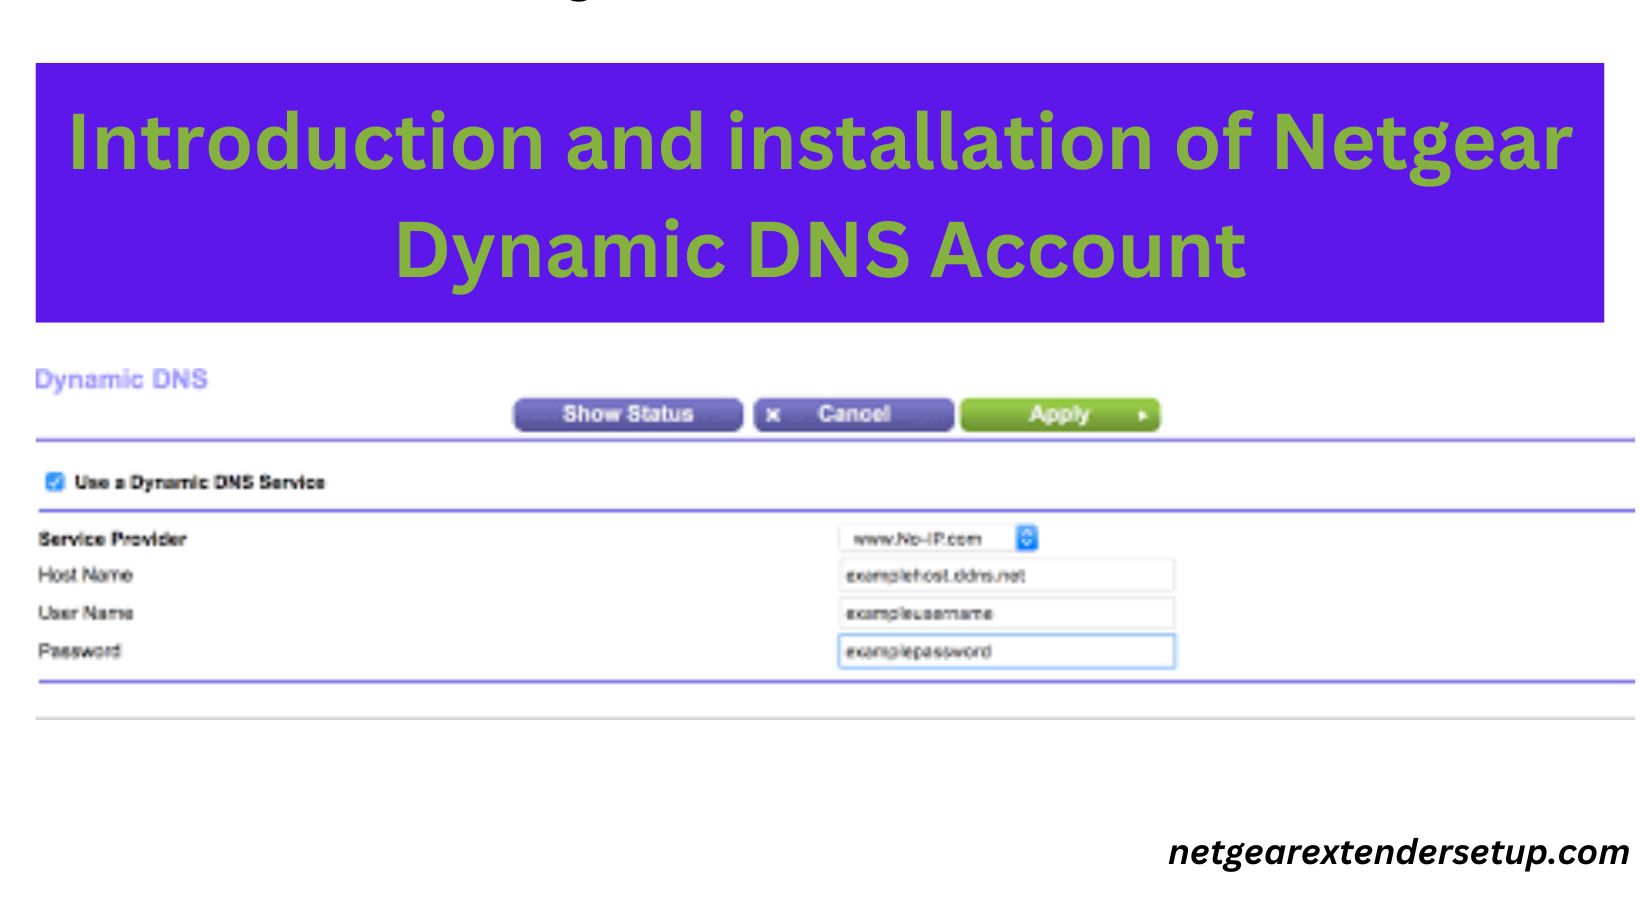
Access Advanced Settings:
Assuming you’ve successfully reached the main dashboard, navigate to ADVANCED > SETUP > DYNAMIC DNS. Select ‘USE A DYNAMIC DNS SERVICE,’ click on the NETGEAR button under the SERVICE PROVIDER menu, and enter your email, password, and host name. Click ‘REGISTER’ and follow the confirmation email’s activation link.
Precaution: If the activation link is delayed, refrain from closing the browser. Instead, refresh the page and await the link.
Verify Account Status:
Confirm the functionality of your Netgear Dynamic DNS account by visiting the router’s web interface. Click ‘SHOW STATUS’ and ensure the listed IP address matches the WAN IP address of your wireless router.
Precaution: Adhere to the provided guidelines to avoid complications during the DNS account setup.
In Conclusion:
This concludes our exploration of Netgear Dynamic DNS accounts and their setup through the router’s wizard. We hope this guide proves helpful. For more detailed instructions, consult the product manual, covering topics such as changing router passwords, Netgear access point setup, parental controls, guest network creation, troubleshooting tips, and an array of customizable router settings. Whatever your query, you’ll find the answers there!
Read More: Spy on Devices Connected to My WiFi Extender
FAQ:
Monthly confirmation is required to prevent the automatic deletion of your DDNS host name, ensuring its continuous availability.
Clearing history and cache prevents technical issues during the setup process
Reset the router to default settings or refer to the product manual for guidance on recovering login information.
Refresh the page and wait for the email. Check spam folders, and ensure the provided email is correct.
Matching IPs ensures the proper functioning of the Dynamic DNS service.